|
 |
| iMiser
Quick Help |
 |
iMiser Research Assistant Tutorial

Use this award-winning program to save the facts, images, and information you find on the Internet before they're gone forever!
Save and organize almost any type of information, such as names, addresses, electronic receipts, e-mails, projects, research, blogs, Newsgroup and forum messages, how-to articles, maps, recipes, and much more. Organize the contents of your hard drive by importing txt, pdf, rtf, doc, and many other file types. Drag text from any drag-enabled program into iMiser.
This version of iMiser features a Multiple-Document Interface (MDI), which allows you to open an unlimited number of saved Web pages, live browser windows, and word processor documents at the same time. Use your favorite browser or use the multi-window iMiser browser with a selective Popup Blocker. Just enter a URL in the Address Bar and press Enter. To open a record or a live browser in a new window, use New on the menu. To open a link on an online page in a new window, Shift-Click the link. To open a record in iMiser Favorites or the Records List in a new window, Shift-Click the entry in Favorites or the Records List.

Quick Start
Saving Web pages, e-mail, images and text is Easy!
- Click the Drop Target button
 on the toolbar or press Ctrl+T. on the toolbar or press Ctrl+T.
This will display a floating, movable Drop Target.  that will retain its position.
- Be sure the browser or other application in which you're interested is the active (highlighted) window by clicking it's title bar. This allows iMiser to locate the correct window. If you were just working on this window, you don't have to click the title bar.
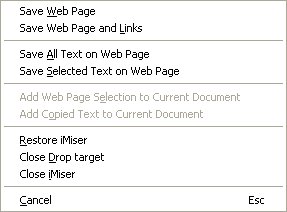
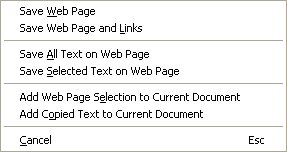
- To save Web pages and text, click the drop target to display an Import Menu.
- Selected text and images can be saved by dragging them to the drop target. Wait until the pelican's mouth opens before making the drop.
That's all you need to know to start saving Web pages !
 |  New in this version of iMiser is a feature for
auto-importing Internet Explorer® Favorites for use with the iMiser browser. If Internet Explorer is not your browser of choice, you can export your favorites from another browser and import them into Internet Explorer. To view Internet Explorer Favorites click New in this version of iMiser is a feature for
auto-importing Internet Explorer® Favorites for use with the iMiser browser. If Internet Explorer is not your browser of choice, you can export your favorites from another browser and import them into Internet Explorer. To view Internet Explorer Favorites click  just above iMiser Favorites. just above iMiser Favorites.
| You may have noticed that certain browser keys don't respond in the Address Bar and text boxes. This is because the browser is "trapping" the key before the Address Bar and text box have a chance to react to the keystroke. Such keys include backspace, left/right arrow keys, Ctrl+C, space, and other keys. We have largely corrected this issue, but if it
occurs, it can be fixed by clicking the browser and clicking the Address Bar or text field again.
| This version of iMiser will now save most video files. About 29 video formats are supported. See Help > Tips and Tricks > Saving Video Files for more information.
| Dragging and dropping database records and folders in iMiser Favorites has been enhanced. While dragging an item, the Favorites view will scroll up, down, left, and right as you move the mouse pointer. Also, when the pointer is over a folder you can press F2 to expand or collapse the folder.
| There is now a smart Save button  on the upper toolbar. It's enabled only when there's something to save. Note that during certain drag/drop operations, a database record will save itself automatically. on the upper toolbar. It's enabled only when there's something to save. Note that during certain drag/drop operations, a database record will save itself automatically.
| This version has an enhanced iMiser Explorer for saving local text files and selected text from any word processor or text-based file. Click  just to the right of the Address Bar to browse the contents of your hard drive or network drives. To view the page elements of a saved Web page, press Ctrl when clicking this button. You'll be able to view saved images, as well as css, js and other files. just to the right of the Address Bar to browse the contents of your hard drive or network drives. To view the page elements of a saved Web page, press Ctrl when clicking this button. You'll be able to view saved images, as well as css, js and other files.
| The existing Database Integrity Tester has also been enhanced. On the menu, click Tools > Test Database Integrity. This will produce a report, located in the iMiser\Reports folder, that will include a list of any corrupt database records (a rare occurrence), as well as records with a missing title, date, or URL.
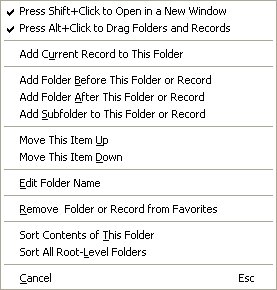
| You can reorganize iMiser Favorites by dragging and dropping folders and database records to another location.
- Place the mouse cursor over the folder or record you want to drag.
- Press and hold the Alt key.
- Click and drag an item to a different location. After the drag has started, the Alt key can be released.
| You can open the Drop Target
automatically when you open iMiser to let you start saving data right away. See Options > Preferences > Defaults on the menu.
| Be sure to use the Right-Click Menus to see all available features and options.
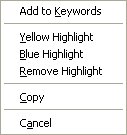
Select some text in a saved Web page and right-click the selected text.
Web Page Right-Click Menu
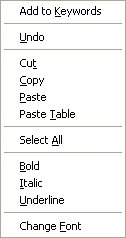
Select some text in an iMiser word processor record and right-click it.
Word Processor Right-Click Menu
Right-click a folder or record in iMiser Favorites.
iMiser Favorites Right-Click Menu
| | To add a saved Web page or document to iMiser Favorites with one click, first select a folder, then click the Add Favorite button  just above Favorites. just above Favorites.
| To add a keyword to the Keywords List Fast, double-click a word in a saved Web page or document.
To add a phrase to keywords,
select it and drag it to the Add Keyword Box or right-click it.
| To save email, use Save all text on Web page on the Import Menu. E-mail can also be saved as a Web page and by drag and drop. For best results, be sure to highlight the Subject, Date, and From and To names, as well as the body of the e-mail, before dragging it to the Drop Target. This suggestion also applies to Newsgroup and forum messages.
| To highlight important Web page text in yellow, select the text and right-click it or click  on the toolbar. Highlight light-colored text in blue. on the toolbar. Highlight light-colored text in blue.
| You can change the iMiser screen colors, as well as it's behavior, in Options > Preferences. To access iMiser Preferences quickly, click  on the toolbar. on the toolbar.
| To expand the Document Window horizontally, drag the Splitter Bar just to the left of the window. A yellow double-arrow will appear when the mouse cursor is over the splitter bar.
| To expand the Document Window vertically, click the Expand Button  on the right.
| To go back online to the Web page of the current record, click the link in the Source Field.
| To e-mail a saved Web page or document to a friend, click  on the
toolbar. on the
toolbar.
| You can automatically organize your documents by adding a document to iMiser Favorites during an import. Just click the checkbox on the first screen of the Import Wizard
or set it in Options > Preferences > Imports.
| | | | | | | | | | | | | | | | | | |
Table of Contents
A Brief Introduction to iMiser
iMiser is used to save text, images, and entire Web pages in an easy-to-use database. iMiser is a powerful research tool and can be used to organize the Web, newsgroup messages, and e-mail, as well as local files. You may prefer to use the External Drop Target to save data. The Drop Target sits on top of the Desktop, waiting for you to drag and drop text
files, images, or selected text from your word processor or newsreader. It also sits on top of your Web browser, waiting for you to drag and drop selected text or images from the browser. Clicking the Drop Target will display a menu for importing Web pages or the text on a Web page.
iMiser can also be used as a stand-alone tool for saving data since it has its own Web browser. After a Web page is finished loading in iMiser, an Internal Drop Target will appear to the right of the browser's Address Bar. Text and images can be dragged and dropped on this Drop Target from the iMiser browser or iMiser Explorer. Clicking
the Drop Target will display an Import Menu.
iMiser works with Microsoft® Internet Explorer®, Firefox®, Google® Chrome®, Opera®, Avant®, the America Online® and Compuserve® Web browsers, Netscape® Navigator, and the Mozilla® browser, as well as most other modern browsers and RSS news readers. Saving Web pages is sometimes more accurate and faster with the iMiser Web browser.
Parts of the iMiser Screen

I. Saving Text, Images, and Web Pages
-
Click the Drop Target button on the toolbar or press Ctrl+T.
This will display a floating Drop Target/Import Menu
-
Select the text of interest in your Web browser, word processor, or
any program that is drag-enabled.
Release the mouse button.
-
Drag the text over the Drop Target. Do this by clicking down on the
left mouse button and moving the mouse cursor to the Drop Target.
-
Release the mouse button when the pelican's mouth opens. 
This is usually a good sign that drag and drop can be achieved.
-
If Quick Save is turned off, the Import Wizard will then open and will prompt you for a Title, Date,
and Keywords for this document.
Note: when you are ready to import another document, it's
best to click the Drop Target button on the toolbar again or press Ctrl+T again.
When saving local text files or selected text from text files, it is best to use iMiser Explorer. Click just to the right of the Address Bar. This will open iMiser Explorer
and the Internal Drop Target (pelican).

Follow the instructions on iMiser Explorer to save selected text or text-based files.
Email Tip
When saving e-mail, be sure to highlight and drag and drop the Subject, Date and From and To names, as well as the body of the e-mail, for best results.
-
Select the text of interest in your Web browser, word processor, or any program
that displays text. Ctrl+A is often used to select All text.
-
Copy the text with Ctrl+C, with the Edit menu if available, or by right-clicking the selected text and choosing Copy if that option is available.
-
In iMiser, click the Add New Record button  to add a blank rich-text record to your
database. to add a blank rich-text record to your
database.
-
Click the Document window and press Ctrl+V or select Paste from the Edit menu.
You can also right-click the Document window and select Paste.
New:
You can now drag text from a live
iMiser browser to a
word processor
record.
-
Click the Drop Target button on the toolbar or press Ctrl+T.
This will display a floating Drop Target/Import Menu
-
Drag the image over the Drop Target
-
Release the mouse button when the pelican's mouth opens.
This is usually a good sign that drag and drop can be achieved.
-
After an image is saved, the Image Viewer button  on the toolbar
will be highlighted. You can view the image by clicking this button. on the toolbar
will be highlighted. You can view the image by clicking this button.
Images can also be added from Windows Explorer, from the
Desktop, and
from My Computer.
Note: images that are also links cannot be saved in the current version of iMiser.
Such images can be saved to disk by right-clicking the image, selecting
Save Picture As, then dragging and dropping the image into iMiser.
-
Click the Drop Target icon on the toolbar or press Ctrl+T.
This will display a floating Drop Target/Import Menu
-
Click the iMiser Drop Target and select Save Web Page and iMiser will attempt to save the HTML, images, and other files for that page.
-
If Quick Save is turned off, the Import Wizard will then open and will prompt you for a Title, Date,
and Keywords for this document.
Note: when you are ready to import another document, it's
best to click the Drop Target button on the toolbar again or press Ctrl+T again.
|
Saving All Text on a Web Page
|
-
Click the Drop Target icon on the toolbar or press Ctrl+T.
This will display a floating Drop Target/Import Menu
-
Click the iMiser Drop Target and select Save All text on Web Page and iMiser will attempt to save the visible text on the page.
-
If Quick Save is turned off, the Import Wizard will then open and will prompt you for a Title, Date,
and Keywords for this document.
|
Going Online with the iMiser Web Browser
|
You can go online by entering a URL in the browser's Address Bar and pressing Enter or clicking the Go button.
Another way to go online is by clicking New > Online Web Browser. This will open the browser in a new window.
A third way to go online is to click the Home button. You can change the default home page in Options > Preferences > Internet.
A fourth way to go online is by clicking a link in a saved or live Web page. To open the link in a new window, hold the Shift key down when clicking the link.
To return to the Web page of a page that has already been saved, click the URL in the Source field. This is also true for text that has been saved from a page.
|
The Internal Drop Target/Import Menu
|
When you go online with the iMiser Web browser, the normally green LED
 will
turn red will
turn red  . When the browser is finished
loading the Web page, the Internal
Drop Target (pelican) will appear. . When the browser is finished
loading the Web page, the Internal
Drop Target (pelican) will appear.

This drop target will function exactly the same as the external drop target and will allow you to import data into iMiser without an external Web browser. Text and images in the iMiser browser can be dragged and dropped on the drop target.
CLICK the drop target to display an Import Menu.
II. Using the Import Wizard
If Quick Save is turned off, the Import Wizard will open up when saving text or saving a Web page and will prompt you for a Title, a Date, and one or more Keywords for this document.
In most cases, the Import Wizard will help you quickly select a title, date, and
keywords. Note that the title, date, and keywords can be modified at any time
in the future.
Now you can automatically organize your documents by adding a document to Favorites during an import. Just click the checkbox on the first screen of the Import Wizard or change it in Options > Preferences > Imports.
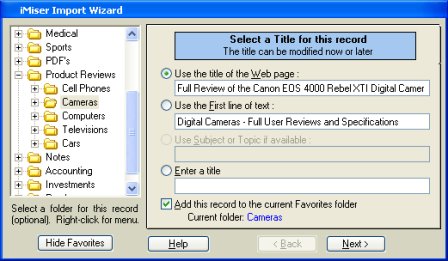
When importing data from a Web browser, the selection Use the Title of the Web
page will be an option, provided that the Web page has a title. In most cases,
Use the First line of text will be an option. Occasionally, the document will contain
the words "Subject:" or "T opic:," in which case, Use the Subject or
Topic if available
will be an option. This is especially useful when saving email.
Select one of these options or modify the existing text to suit your needs. Titles can
be modified at any time in the future. When finished, click Next.
All documents must have a title.
Tip
When saving email by dragging and
dropping it to the drop target, it is important to select the
Subject ,
Date of the e-mail,
and the From and To names, as well as the e-mail body.
When importing text or a Web page, the selection Use the Date of the Last record
and Use Today's date will be options. If iMiser finds a date in the first 10,000
characters of the document, Use a date in this record, if available will also be an
option.
Select one of these options or modify the existing date to suit your needs. Dates
can be modified at any time in the future. When finished, click Next.
All documents should have a date.
Keywords are words or phrases that help classify and identify a document. Several
potential keywords will be derived from the title of your document, from the HTML
of a Web page (if available), or from both, depending on the option you choose in Preferences.
Select one or more keywords for this document by double-clicking the word in the left
box or by highlighting the word and clicking the Add button >. Several words can be
highlighted at the same time by dragging the cursor down the list of words. To select
all words in the left box, click the Add All button >>. When finished click Finish.
Keywords are optional, however it is strongly recommended that one or more
keywords or phrases be added to every record in your database. Keywords are
the actual words you will use to search for records in the database using the
Keyword List Search Tool. If you fail to add keywords, the only other option
for finding a record will involve searching through the entire text of each
document using the Full Text Search Tool. This will take much longer
than searching by keyword.
Note: Keywords can be added at any time with the Add button in the Keywords
Box in the upper-right corner. Add a word or phrase and press Enter. Keywords
can be deleted by highlighting the word and clicking the Del button.
Keyword Tips:
-
Keywords can be added fast by double-clicking any word in the Document
Window.
-
Phrases can be added by dragging the text of interest to the Add Keyword Box.
-
Phrases can also be added with the Right-Click Menu. Highlight
a phrase and right-click it.
-
Be consistent in choosing keywords. For example, consistently add only
the singular of a given keyword. Be aware that
many words will have synonyms.
Be sure to add the same synonym at all times.
III. Navigating
Through Your Database
|
Using the Navigation Buttons
|
You can change to any record (document) in your database by using the
Navigation buttons on the left of the toolbar.
 goes to the First record goes to the First record
 goes to the Previous record goes to the Previous record
 goes to the Next record goes to the Next record
 goes to the Last record goes to the Last record
See Parts of the iMiser Screen.
The Navigation Window, in the lower-left, has three views into your database:
Click the Records List button  to view all the records in your database in native order. You can go to any record simply by clicking a title in the list. to view all the records in your database in native order. You can go to any record simply by clicking a title in the list.
Click the iMiser Favorites button  to see your Favorites. Click the icon to the left of a favorite to go to that record. On some systems, a double-click may be needed. to see your Favorites. Click the icon to the left of a favorite to go to that record. On some systems, a double-click may be needed.
Note: The Navigation Window is also used to display search results found with the
Search Tools.
To view search results, click the Search Results button  just above Favorites.
IV. Using the Search Tools
Bring up the Search Tools by clicking  on the toolbar or by pressing Ctrl+H. on the toolbar or by pressing Ctrl+H.
You can search by Keyword or you can search the entire text of every record.

- Select Search for 1 keyword for your initial search.
- Click the keyword box and start typing the first few letters of the keyword of interest. The drop-down list will scroll to that word.
- Select a keyword by clicking it in the drop-down list.
- Optionally select Use Date range to narrow (limit) your search. Enter a
date in the From and To boxes. These dates will be saved for future searches.
- Click the Search button or press Enter All records for which you have added this keyword will be displayed in the Navigation Window on the left. The total search hits will be shown under Total on the right
- Click a title in the list to view that record. Shift-click a title to open it in a new window.
Keyword Search Tip
If you get too many search results to be practical, you can narrow (limit) your
search by selecting Search for 2 keywords or Search for 3 keywords.
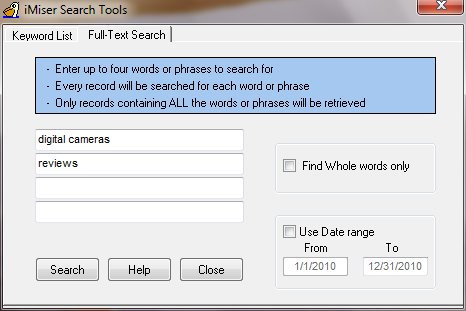
-
Enter up to four words or phrases. The text of each record will be searched
for these words.
-
Optionally select Use Date range to narrow (limit) your search. Enter a
date in the From: and To: boxes. These dates will be saved for future searches.
-
Optionally select Find Whole words only to narrow (limit) your search.
-
Click the Search button or press Enter. Records containing All of the words or phrases
will be displayed in the Navigation Window on the left.
-
Click a Title under Search Results to view that record.
Search Tip
If you get too many search results to be practical using only one word or phrase,
you can narrow (limit) your search by entering words or phrases in one or more
of the remaining text boxes.
V. Finding Text in the Current Document
|
Finding a Word with Saved Text
|
Open the Text Finder tool by clicking  on the toolbar or by pressing Ctrl+F on the toolbar or by pressing Ctrl+F
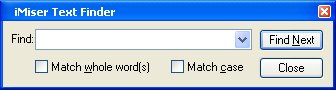
- Enter a word or phrase you want to find in the current document.
- Click the Find Next button or press Enter or F3. If the word is found, it will be highlighted in the document.
- To find other instances of the word or phrase, continue clicking Find Next or pressing Enter or F3.
- Up to 50 text searches will be saved by the Text Finder. To re-use them, click the drop-down arrow and click an entry in the list.
|
Finding a Word with a Saved Web Page
|
If you are searching for text on a saved or live Web page, press Ctrl+F and the familiar Microsoft® Internet Explorer® Find tool will appear. Enter a word or phrase and click
Find Next or press Enter .
VI. Using
iMiser Favorites
Favorites are used to organize everything in your database in a tree-like
hierarchy.
You can create an unlimited number of subfolder levels in the treeview.
Click the Favorites
button to view
iMiser Favorites.

|
Adding a New Folder to Favorites
|
Select an existing folder. Click the New Folder button  on the left. on the left.
The New Favorites Folder box will be displayed.
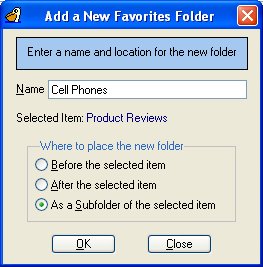
Enter a name for the new folder, and select where to place the new folder
in relation to the folder that was selected.
The New Favorites Folder tool is so versatile that you can add a new folder as a subfolder of an existing database record.
Note: You can also add a folder by using the Right-Click
Menu
|
Adding the Current Record to Favorites
|
First select a folder, then click the Add Favorite button . If the record has been added to Favorites already, you will have to remove it in order to
add it again.
Note: You can also add a favorite by using the Right-Click Menu
|
Deleting a Record or Folder from Favorites
|
Select a folder or record, then click the Delete Favorite button  . .
If the folder you are trying to delete contains other records or folders, you will
be asked if you are sure you want to delete it.
Note: Deleting a record from Favorites will not delete it from your database.
However, deleting a record from your database will delete it from Favorites.
Tip
You can reorganize iMiser Favorites by dragging and dropping folders and documents to a different location. To do this,
place the mouse cursor over the folder or document you want to drag, press and hold the Alt key, then click and drag the object to a different location. Note that the only way to undo this action is to drag it
back again.
|
|
|
Copyright © 2002-2014 AdviceSoft LLC All rights reserved.
iMiser ® is a Registered
Trademark of AdviceSoft LLC.
All other trademarks are the property of their respective owners.
|
|
|
Screen Shots |
- Main
screen
- Screen
colors
- iMiser
Browser
- Import
wizard
-
Search tools
- iMiser
Favorites
- New
folder
- Preferences
|
|
Use
Any Browser |
Use
with Microsoft®
Internet Explorer®,
Mozilla®
Firefox®,
Google® Chrome®,
Opera®, Netscape®,
Avant®,
and the AOL®
and many other Web
browsers.
Version 3.3 is
compatible with
almost all modern
Web browsers.
|
|
Save
the Web |
Save and
organize
Web pages, blogs,
email,
selected Web
page text, images,
RSS feeds, news-
group messages,
discussion forums,
and much more.
|
|
|